Server ActionsをモックしたStorybookのストーリーの作り方

はじめに
最近のNext.jsではServer Actionsを使って、バックエンドの処理を実装することも多々あるかと思います。
ただ、Server Actionsが使われているコンポーネントのストーリーを書くときに、どのように実装すれば上手く動作するのか分からなかったので検証してみました。
環境構築
Next.jsを使う前提になりますので、create-next-appで環境構築していきます。
また、執筆時点ではStorybookがNext.jsのバージョン15に対応しておらずエラーになってしまったため、バージョン14を指定します。
聞かれる質問については、全てデフォルトの選択でOKです。
npx create-next-app@14Storybookは公式ドキュメントに記載の通り、以下のコマンドでインストールしておきます。
npx storybook@latest initまた、設定しなくても問題ないですがインストール後に.storybook/preview.tsにグローバルのCSSファイルを以下のようにインポートしておくと、StorybookでもTailwindのスタイルをあてることができます。
.storybook/preview.ts
import type { Preview } from "@storybook/react";
import "../app/globals.css"; // 追加
今回作るコンポーネントとストーリー
今回例として扱うコンポーネントは、以下のようなフォームコンポーネントとしたいと思います。
送信ボタンはuseFormStatusを使ってServer Actionsの処理状況をstateとして扱うため、別コンポーネントに切り出しています。
components/ExampleForm.tsx
"use client";

import { createBooking } from "@/actions";
import SubmitButton from "./SubmitButton";

const ExampleForm = () => {
  return (
    <div>
      <form
        action={async (formData) => {
          await createBooking(formData);
        }}
        className="py-10 px-16 flex gap-5 flex-col"
      >
        <div>
          <label htmlFor="name">Name</label>
          <input
            name="name"
            id="name"
            className="border border-gray-400 px-4 py-2 text-primary-800 w-full rounded-md"
          />
        </div>
        <div>
          <label htmlFor="numGuests">How many guests?</label>
          <select
            name="numGuests"
            id="numGuests"
            className="border border-gray-400 px-4 py-2 text-primary-800 w-full rounded-md"
          >
            <option value="" key="">
              Select number of guests...
            </option>
            <option value="1" key="1">
              1 guest
            </option>
            <option value="2" key="2">
              2 guests
            </option>
          </select>
        </div>

        <div>
          <label htmlFor="observations">
            Anything we should know about your stay?
          </label>
          <textarea
            name="observations"
            id="observations"
            className="border border-gray-400 px-4 py-2 text-primary-800 w-full rounded-md"
          />
        </div>

        <div className="flex justify-end items-center">
          <SubmitButton />
        </div>
      </form>
    </div>
  );
};

export default ExampleForm;
components/SubmitButton.tsx
"use client";

import { useFormStatus } from "react-dom";

function SubmitButton() {
  const { pending } = useFormStatus();

  return (
    <button
      className="bg-amber-500 px-5 py-3 rounded-md text-gray-50 font-semibold hover:bg-amber-600 disabled:cursor-not-allowed disabled:bg-gray-500 disabled:text-gray-300"
      disabled={pending}
    >
      {pending ? "送信中..." : "送信"}
    </button>
  );
}

export default SubmitButton;
また、Server Actionsは以下のように別ファイルに作成しておきます。(キャッシュ削除やリダイレクト先のパスは適当なものを入れています)
actions/index.ts
"use server";

import { revalidatePath } from "next/cache";
import { redirect } from "next/navigation";

export async function createBooking(formData: FormData) {
  // 何かしらデータを追加する処理...

  // キャッシュ削除
  revalidatePath("/");
  redirect("/thankyou");
}
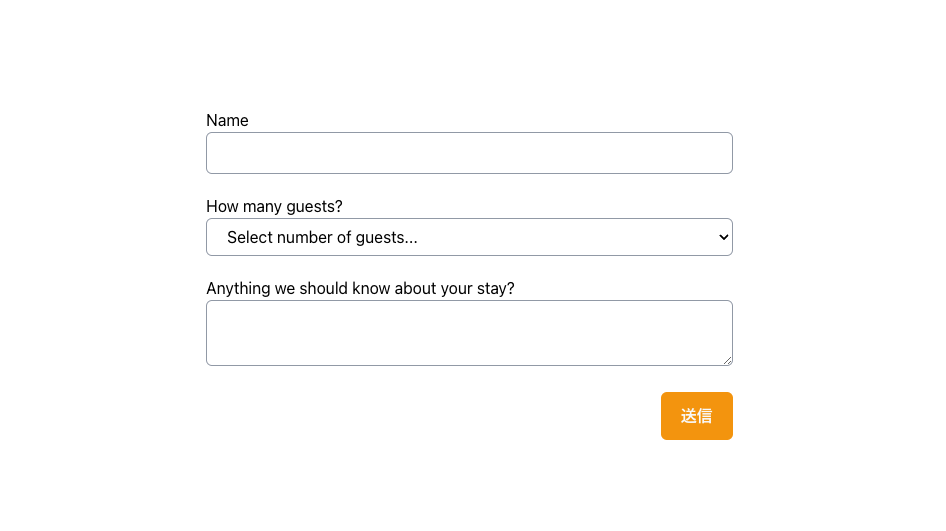
上記のコードで、以下のような簡単なフォームができあがります。
ストーリーの実装
上記のコンポーネントを使って、Storybookのストーリーを以下のように書いてみます。
ストーリーの中ではplay関数を実装しており、ボタンをクリックした時のボタンのテキストが変化するかを確認しています。
stories/ExampleForm.stories.ts
import type { Meta, StoryObj } from "@storybook/react";
import { fn } from "@storybook/test";

import ExampleForm from "@/components/ExampleForm";

const meta = {
  title: "Components/ExampleForm",
  component: ExampleForm,
  tags: ["autodocs"],
} satisfies Meta<typeof ExampleForm>;
export default meta;

type Story = StoryObj<typeof meta>;

export const Default: Story = {
  play: async ({ canvasElement }) => {
    const canvas = within(canvasElement);
    const submitButton = canvas.getByRole("button");
    // 必須項目を入力
    const numGuestsSelect = canvas.getByLabelText("How many guests?");
    await userEvent.selectOptions(numGuestsSelect, "1");

    // 送信していない時のボタンの文言をテスト
    expect(submitButton).toHaveTextContent("送信");

    // submitボタンをクリックしてformを送信する
    await userEvent.click(submitButton);

    // 送信中の送信ボタンの文言をテスト
    expect(submitButton).toHaveTextContent("送信中...");
  },
};これでnpm run storybookでStorybookの表示をブラウザで確認すると、リダイレクトのエラーが発生してしまいます。
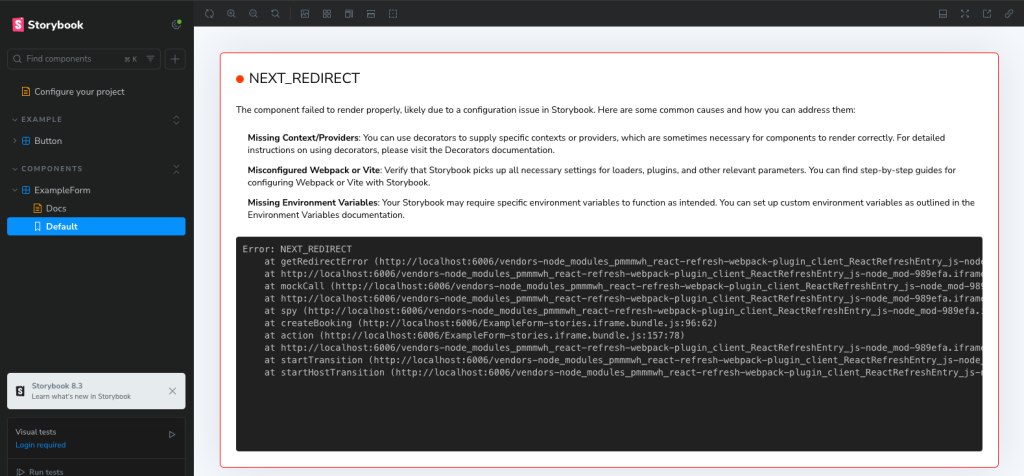
上記のplay関数の中でボタンをクリックする実装をしていますが、現状だと実際のServer Actionsが発火するので、その中でリダイレクト処理などをしているとエラーになってしまい、ボタンの状態変化などは確認することができません。
このような問題を解消するため、またそもそもテストやStorybookでのプレビューの際はモックを使うのが良いかと思うので、Server Actionsのモックを作ってあげます。
以下で、モックを作るための導入手順を解説していきます。
モック関数の定義
まず、actions配下にindex.mock.ts(名前は任意)を作成し、その中で以下のコードを追加します。
actions/index.mock.ts
import { fn } from "@storybook/test";
import * as actual from ".";

export * from ".";
export const createBooking = fn(actual.createBooking).mockName("createBooking");ここでは、@storybook/testを使ってモックするアクションの関数名を指定し、モック関数を作成しています。
ストーリーの修正
ストーリーの中でServer Actionのモックを実装します。
Storyの中のbeforeEach内でmockImplementataionを使ってモック関数の処理を定義することで、モックの実装ができます。
実際には以下のようなコードを追加します。一定の秒数でPromiseを返すsleep関数を定義し、モック関数内で実行するようにしています。
sleepは0秒でも実行しておかないと想定通りの挙動にならなかったので入れておきます。
stories/Example.stories.ts
import type { Meta, StoryObj } from "@storybook/react";
import { expect, fn, userEvent, within } from "@storybook/test";
import { createBooking } from "#actions/index.mock"; // 追加

(略...)

// 追加
const sleep = (ms: number) => {
  return new Promise((resolve) => setTimeout(resolve, ms));
};

export const Default: Story = {
  // 追加
  beforeEach: () => {
    createBooking.mockImplementation(async () => {
      await sleep(0);
      return;
    });
  },
  play: async ({ canvasElement }) => {
    const canvas = within(canvasElement);
    const submitButton = canvas.getByRole("button");
    // 必須項目を入力
    const numGuestsSelect = canvas.getByLabelText("How many guests?");
    await userEvent.selectOptions(numGuestsSelect, "1");

    // 送信していない時のボタンの文言をテスト
    expect(submitButton).toHaveTextContent("送信");

    // submitボタンをクリックしてformを送信する
    await userEvent.click(submitButton);

    // 送信中の送信ボタンの文言をテスト
    expect(submitButton).toHaveTextContent("送信中...");
  },
};
package.jsonの設定変更
package.jsonでServer Actionsのディレクトリへのインポートのエイリアスを作るため、以下の設定をdevDependenciesの下あたりに追加しておきます。
package.json
"devDependencies": {
    ...
},
"imports": {
    "#actions": {
      "storybook": "./actions/index.mock.ts",
      "default": "./actions/index.ts"
    },
    "#*": ["./*", "./*.ts", "./*.tsx"]
}
コンポーネントの修正
Server Actionを使っているExampleForm.tsx内のインポート文を、上記で追加したエイリアスを使ってインポートするように修正します。
components/ExampleForm.tsx
// import { createBooking } from "@/actions";から以下に修正
import { createBooking } from "#actions";
動作確認
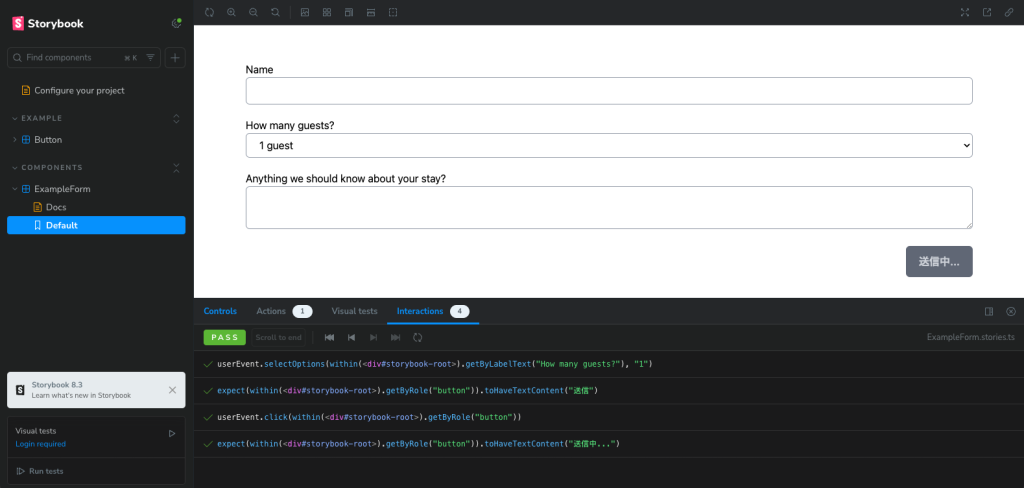
以上で設定が完了したので、もう一度Storybookの画面でストーリーを見てみると、playが成功しており、プレビューが見れることが確認できます!
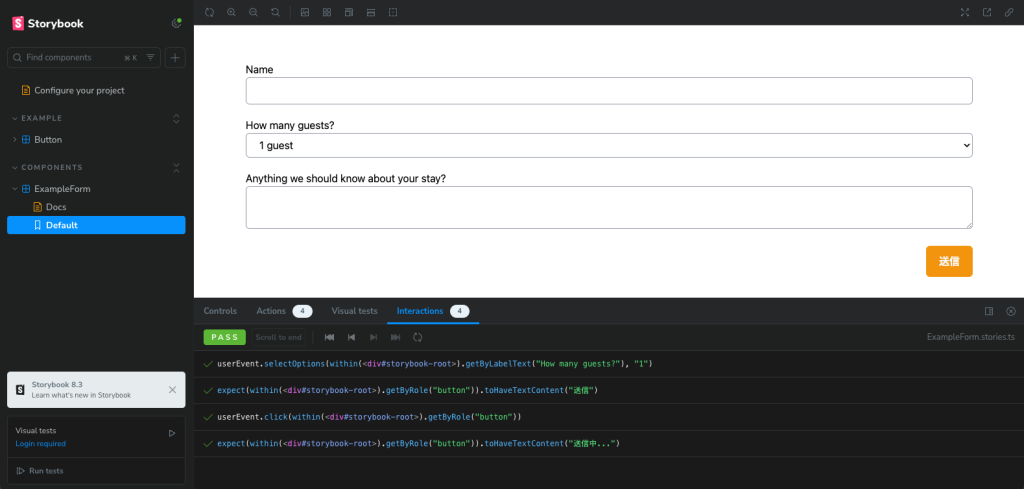
また、上記のplay関数内ではsleepの秒数を0秒にしていましたが、1秒(msなので1000で指定)などに値を調整することで画面からボタンをクリックして実際にテキストが変わることも確認できます。
終わりに
Server Actionsをモックする方法を紹介しました。
公式ドキュメントに関数のモックの方法は書いてあるものの、細かい部分で色々な記事を参考にする必要があり少し苦戦したので、実装の際の役に立てば幸いです。


