AndroidのライブラリDraggablePanelを使ってみる

最近Googleさんが社内の福利厚生でブラジリアン柔術を始めたらしく、大変盛況らしい。 → Googleが福利厚生に採用した「ブラジリアン柔術」が日本のビジネスマンにも人気な理由
やっとGoogleさんも柔術の良さが分かってきたんだな、と何故か上から目線なひよっこ柔術エンジニアの前田です。
本日はそんなGoogleさんの出したAndroidについてです。
社内はもちろん、周囲でもスマートフォンはiPhoneがほとんどですが、逆風にめげずに書いていきたいと思います。
私の持っているスマートフォンはAndroidなのですが、プライベートで少しアプリを作っておりまして、YouTubeのようなUIを簡単に作ることが出来るライブラリ「DraggablePanel」が個人的に興味があったので触ってみました。
ライブラリをアプリ内に組み込むだけで、下記のようなYouTubeっぽいUIが実現出来ます。
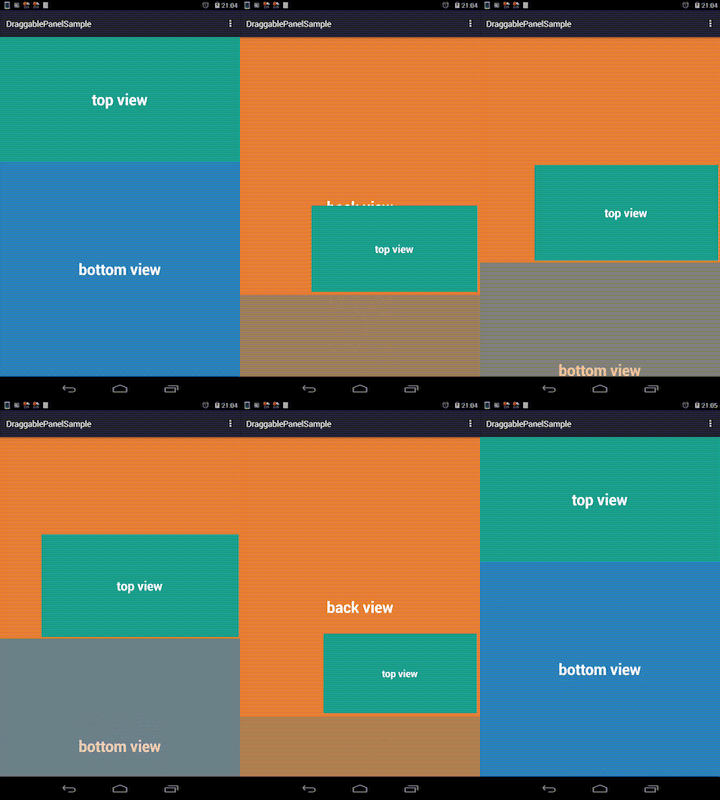
日本のアプリでは使っているアプリをあまり見たことが無いので、積極的に使ってみたら目立てるのではないかと思います。
では早速実装してみます。
環境:Android Studio
まずは適当にプロジェクトを作ります。
プロジェクト名はDraggablePanelSampleとしました。
次に、ライブラリを組み込みます。
app/build.gradle
〜 略 〜

    defaultConfig {
        applicationId "sample.draggablepanelsample"
        minSdkVersion 10
        // targetSdkVersionを19以下にしないとビルド出来ないのでご注意を。
        targetSdkVersion 19
        versionCode 1
        versionName "1.0"
    }

〜 略 〜

dependencies {
    compile fileTree(dir: 'libs', include: ['*.jar'])
    // 下記の3行を加える
    compile 'com.github.pedrovgs:draggablepanel:1.3@aar'
    compile 'com.Android.support:support-v4:19.1.+'
    compile 'com.nineoldAndroids:library:2.4.+'
}
そしてAndroid Studioのgradle syncボタンをポチっと押すだけ!

以上です。
とここで終わったら怒られると思いますので、もう少し。
それではプロジェクトの中で使ってみます。
app/src/main/res/layout/activity_my.xml
〜 略

    <com.github.pedrovgs.DraggableView
        xmlns:android="http://schemas.android.com/apk/res/Android"
        xmlns:draggable_view="http://schemas.android.com/apk/res-auto"
        android:id="@+id/draggable_view"
        android:layout_width="fill_parent"
        android:layout_height="fill_parent"
        draggable_view:top_view_id="@+id/top_view"
        draggable_view:bottom_view_id="@+id/bottom_view">

        <LinearLayout
            android:id="@+id/bottom_view"
            android:orientation="vertical"
            android:background="#2980b9"
            android:layout_width="fill_parent"
            android:layout_height="fill_parent"
            android:gravity="center"
            >

            <TextView
                android:layout_width="wrap_content"
                android:layout_height="wrap_content"
                android:text="bottom view"
                android:textSize="50px"
                android:textColor="#ffffff"
                android:textStyle="bold"
                />

        </LinearLayout>

        <LinearLayout
            android:id="@+id/top_view"
            android:layout_width="fill_parent"
            android:layout_height="300dip"
            android:orientation="vertical"
            android:background="#16a085"
            android:gravity="center"
            >

            <TextView
                android:layout_width="wrap_content"
                android:layout_height="wrap_content"
                android:text="top view"
                android:textSize="50px"
                android:textColor="#ffffff"
                android:textStyle="bold"
                />

        </LinearLayout>

    </com.github.pedrovgs.DraggableView>

 〜 略
ポイントは@+id/top_viewを@+id/bottom_viewの下に配置することです。
これを逆にすると上手く動きません。
ソースコードは下記レポジトリに上げております。
Javadocも生成済です。
git cloneしてお試しください。
弊社は主にRuby on RailsやAngularJSなどのwebアプリケーションサービスがメインですが、iPhoneやAndroidのスマートフォンアプリもやっていきたいと思っておりますのでどうぞ宜しくお願いします!


